Getting the most out of your electronics for Lake Erie walleye
Sonar and GPS technologies have changed rapidly over the past few decades and continue to improve every year. For anglers like me that have spent most of their fishing careers using quality electronics, the changes are exciting because our fishing techniques have evolved right along with the newest electronics technologies available. On the Great Lakes, quality electronics are a safety necessity, not to mention how important they are for successful fishing.
I’m often asked what the best sonar settings are for finding and catching walleye on Lake Erie. My first response is always, “What are you using your sonar for?” That might seem like a sarcastic response to a simple question, but I’m very serious. Once you completely understand specifically what you are using your electronics for then you can confidently set them up to accomplish the task at hand.
On Lake Erie, I’m either trolling open water flats or shallow water structure, and I set up my electronics accordingly. Deep and shallow water are relative in the western end of Lake Erie, as most of the lake is less than 40 feet deep. Most open water that I fish is 20 to 40 feet deep and most structure that I troll ranges from 5 to 30 feet deep. The key to the appropriate setup is determining if I’m using the sonar to find roaming open water schools of fish, or if I’m using both sonar and GPS to troll very specific contours while watching for substrate changes.
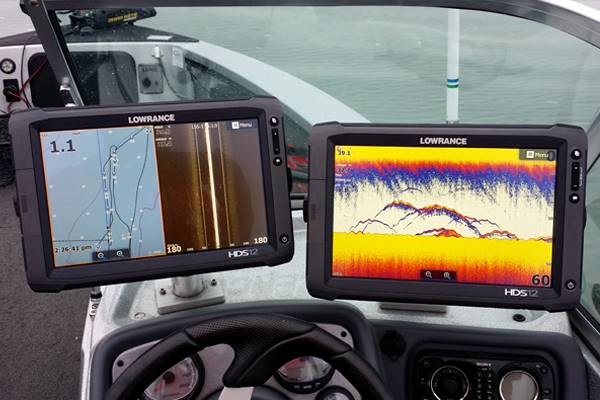
Two Lowrance HDS 12 Gen 2 units mounted at the driver’s console with contour map and two sonar displays. (Credit: Travis Hartman)
My boat is a fiberglass Lund 208 Pro-V GL with two Lowrance HDS 12 Gen 2 Touch units. I have three mounting locations for the two units: I can put them both at the driver’s console or move either up the bow for connection to the internal 200 kHz transducer on my bow mount trolling motor. On the transom I have a combo 83/200 kHz skimmer transducer mounted beside the structure scan HD transducer. It’s important to know what frequencies your transducers are so that you can fully utilize all your electronics’ options.
The newest Lowrance HDS units are absolutely incredible for finding open-water fish. With properly mounted transducers that are deep on the transom mounted with minimal interference, I can run around 30 mph on most days and know exactly how good the fish “marks” are below me. On the calmest days I can run over 40 mph and still see if I’m on fish or not. The importance of this can’t be overstated for open water trolling. The old days of “hoping” you found the right fish are over. Today’s electronics leave no doubt what is below you. If you don’t see the fish, keep driving. At times it can be difficult to commit to driving until you find good enough marks, but you’re wasting time if you don’t. I have literally spent as much as an hour driving around looking for fish after I made a long run to get to the area.
The key to finding open water fish is using the transducer frequency with the widest angle and most coverage. I use the 83 kHz frequency of my transom transducer, which covers the most area and gives me the best crisp fish “arches” when looking for open water walleye. I’ll still commit one pane of the head units to sidescan or downscan sonar, but I can see everything I need on the traditional sonar. The GPS screen is important, but mostly for waypoints. I put a waypoint in every time I get a hit, and those become my reference points for active fish. If I go too far from waypoints without a hit, I circle back. If I keep getting hits and I’m still marking fish, I’ll keep trolling.
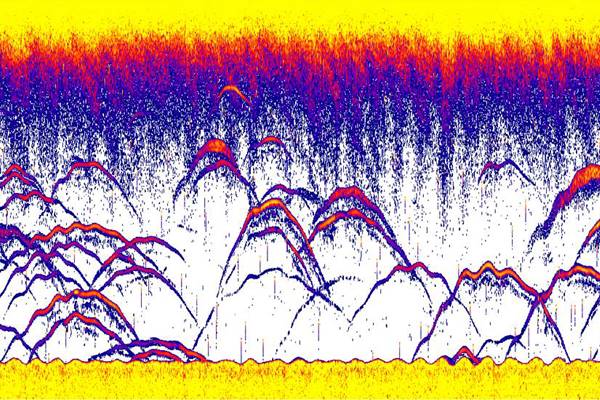
The 83 kHz frequency covers the most area and gives the best crisp fish “arches” when looking for open water walleye. (Credit: Travis Hartman)
When I’m trolling shallow water structure for contour- and substrate-oriented walleye, my electronics strategy changes. Now I’m more interested in bottom hardness and depth than looking for fish. I’ll start in as little as 5 to 10 feet of water and slowly work my way deeper until I find active fish. Once I find active fish I pay a lot of attention to what depth and structure they are in and then use the electronics to stay in similar areas. Today’s units show more fish tight to the bottom in rocks than ever before, so you can certainly get a feel for the presence or absence of fish. But you will have plenty of good structure fishing days paying more attention to the substrate compared to simply looking for fish arches. For this application, the 200 kHz frequency is the best option. The narrower cone and higher frequency is extremely good at giving you the most accurate depth reading and the best bottom hardness representation. If you’re fishing steep break lines that change quickly, you can improve your boat control by using the bow mount trolling motor transducer instead of the transom transducer. That will allow you to see upcoming depth changes more quickly and react before you lose touch with the depth range that you’re trying to maintain.
It’s also critical to give as much as an entire screen to the sidescan transducer so that you can identify isolated rock piles or other structure that might hold fish. Once you see potential fish holding structure on the sidescan, you can scroll back to it and put a waypoint on the screen right where the structure is. GPS is also extremely important here. You need to use the best background contour map available, either with built-in Insight maps or with Navionics map cards. While no map is 100 percent correct for every structural feature, you will be light years ahead if you start with a high-detail map and learn from there. Structure fishing is very electronics-intense, and I utilize every inch of screen space to take in as much information as I can to quickly unlock that day’s secrets for the structure that I’m fishing.
The final piece of utilizing the full potential of your electronics is to log all of your sonar files from every trip. With an empty SD card and a few simple key presses, you can log all of your sonar channels while you are fishing. I start a new file on each trolling pass and then end it before I pick up and run. All of these files can then be uploaded to Lowrance’s Insight Genesis online mapping service. Once you’ve collected enough data in areas that you regularly fish, you will be able to make your own high detail contour map and then load it right back onto your head unit. Making your own maps of your favorite spots is going to change the way that you fish and make you ultra-efficient on future trips. It doesn’t take long for the sonar logs to add up: During the 2014 season I mapped the equivalent of around 4,000 acres of water.

0 comments